Hiển thị các bài đăng có nhãn mountain. Hiển thị tất cả bài đăng

Thứ Bảy, 21 tháng 2, 2015

[DIY] A Ride to the Crater of Mt Pinatubo


Mt. Pinatubo is situated in the section of Luzon called Cabusilan Mountain Range also known as the Zambales Mountains. It became a mainstream right after its major eruption back in 1991. That eruption was labeled as the second largest terrestrial eruption of the 20th century next to Novarupta where its effects were devastating and felt worldwide. Now, although Mt. Pinatubo and areas surrounding it is still covered by lahar deposits, it has also become a tourist attraction of the country because of the wonderful landscape it has become. Adventure seekers, nature lovers and landscape photographers will surely enjoy exploring the site most specially its crater part.

How to get there?
Me and my friends goal was to ride our mountain bikes from the jump off point of Mt. Pinatubo up to its crater. But do not worry as this blog will still show you on how to get there by commute/public transportation. Our journey starts as we arrive at the bus terminal of Victory Liner in Pasay. We chose Victory Liner because they do not charge carrying cargo such as bikes. You can take any bus that will pass by Capas Junction. Buses going to Baguio, Dagupan, Pangasinan and Tarlac are some of the bus route that will take you there. We took the bus going to Dagupan and just told the bus conductor to drop us at Capas (near the Capas Municipal Hall). We then paid 180 pesos each which was a 3-hour bus ride. As we alight at Capas, we then started pedaling our bikes in search of a hotel to stay in. The next day, we started pedaling again going to the Tourism office of Mt Pinatubo for registration. As for you, take a tricycle in Capas to take you directly to Santa Juliana tourism office. It will be a long ride as well so fare will be most likely 300 pesos, one way.

On our way to the tourism Office
The registration area
Satellite Municipal Tourism Office
Tourists who wanted to see Mt. Pinatubo must register first at the tourism office and settle the fees below. By the way, these are mandatory fees and you'll not be able to pass through the security of Mt Pinatubo without the approval of this office. Note: The office is open as early as 6am and closes by 10am. Meaning to say, visitors must settle a ride going to Mt Pinatubo before the office closes. Visitors who'll not be able to book a ride before that time will have to try their luck the next day. Aw.

4x4 Jeepney Ride - 3,000 pesos (good for 5 pax)
Local Guide Fee - 500 pesos
Registration/Conservation fee - 450 pesos/pax

For Reservation:
SATELLITE MUNICIPAL TOURISM OFFICE
Ms Mai - 0947-3912134
capastourism.com

Signing to a waiver...
Even we have our bikes and intend to ride it all through out from the tourism office, we were still obligated to rent the 4x4 jeepney. It is a policy that visitors should be accompanied by a jeep when visiting the crater. So basically the 4x4 jeepney serves as our convoy.

Approximately, it was a 1 1/2 hour jeepney ride packed with breathtaking views. I didn't mind the striking heat of the sun because of what my eyes saw during the trip. I never thought that the destruction of 1991 eruption will result to an art-like landscape now. You can even instruct the driver to stop anywhere along the road if you intend to take photos of the views as well as the locals and aetas that lives there. The aetas who lives there are really friendly, you'll see them smiling and waving their hands as you passed by them. Tip: Smile back, ok?

Can you feel the heat? hehe
More visitors that day
This way will lead you to the village of aetas
Reached the point where we have to lift and roll our bikes
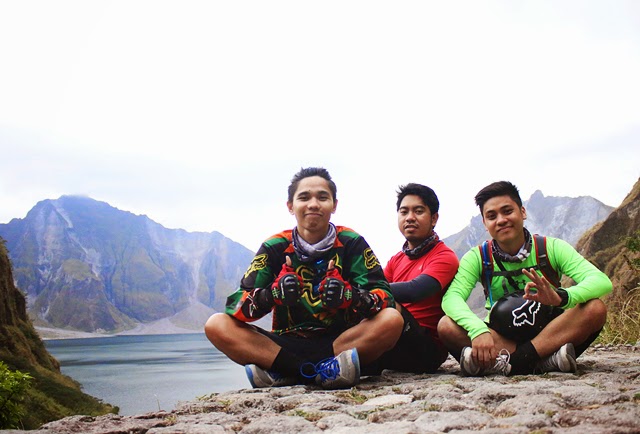
After the bumpy with river crossing ride, you'll reach the point where will lead you to the crater of the mountain. In this case, you'll have to walk. I saw a sign that says, it will be just a 1km trek to reach the top. More or less it will be just a 20 minutes trek. In our case, it took us 30-40 mins as we have to lift our bikes up to the crater. Haha. I felt sorry for my bike because it was a hard one for her. I bumped her so many times and even scratched some of its part. Huhu. But nonetheless, as we've reached the top, it was all paid off. The fresh air, the crater, the view... it was a site to see! Time for more photo op! Note: There are comfort rooms in the area. Tip: Packed your own food and water. Yes, there are stalls on your way up however they sold it like 3-4 times of its original price.

Finally! Our goal!
So calm... so relaxing...
Thanks "Kerida" for not letting me down :)
Time for some groupfie...
...and selfies as well :)

We stayed in the crater for an hour  and it was already 3pm when we decided to go down again. We were excited on our way down because it will be an epic ride for our mountain bikes. We were like jets with our speed. The 4x4 jeep who convoyed us even had a hard time keeping with our pace. We reach the tourism office by 5:30pm and went all the way back to the terminal with our bikes.

Travelling and biking... this is life!!!
Yup, there are streams along the way
And rivers too!
More 4x4 jeepneys
Thank you Mt Pinatubo for this epic ride!
It was indeed a memorable bike ride for each of us. Mt. Pinatubo surely left a mark on our lives which we will never forget.

Breakdown of expenses:
Bus (Pasay Terminal - Capas Junction) - 180 pesos
Tricycle (Capas - Tourism Office) - **.**
4x4 Jeepney ride - 3,000 pesos
Local guide - 500 pesos
Registration/Conservation fee - 450 pesos
Tricycle (Tourism Office - Capas) - **.**
Bus (Tarlac Bus Terminal - Pasay) - 211 pesos
Food - *.**

Thứ Sáu, 21 tháng 3, 2014

Mt Pico de Loro and the Parrot's Beak - Ternate, Cavite Route


Mt Pico de Loro is not new to me as this is already my second time to conquer this mountain. But like what every mountaineers say, every hike is different. The difference of this hike were 1) unlike my first climb, I only went there for a day hike. Now I'll be staying for an overnight. 2) We did a night trek going up and 3) lastly, I climbed the monolith slash the famous Parrot's Beak.

Just to give you a short background, Mt Pico de Loro (also called as Mt Palay Palay) is situated in the boundaries of Cavite and Batangas. While having said that, trekkers who wanted to climb Mt. Pico de Loro have a choice whether they'll start on the jump off point in Nasugbo, Batangas or the one which is located in Ternate, Cavite. Cool huh? Also, in Cavite it is considered to be as the highest point with a topography of 664 MASL (according to Pinoy Mountaineers).

How to get there?
Well since most of us in this trip were Cavitenos, we started our adventure on the jump off point located in Ternate, Cavite. Going there is just plain and simple. From Baclaran or Coastal Mall Terminal, ride a bus with a signboard going to Ternate. Tip: Make sure that it will passed through Cavitex as that is a much faster way to reach Ternate. You'll be dropping off at the last point which is the Ternate Terminal so getting lost on the way is impossible. Lols! Bus fare is 84 pesos and it will take 2-3 hours. Alight at Ternate Bus Terminal, you can rent a tricycle for 75 pesos per head or a jeepney (didn't know the price) going to the jump off point/registration area of Mt. Pico de Loro. Renting a tricycle is ideal for small groups while jeepneys, well of course, are for large groups who wish to visit the said mountain.

Team Love and Team Baby ko

Upon reaching the feet of Mt. Pico de Loro, we first proceed on the registration area near the jump off point. Registration fee is 25 pesos per head. There is also a comfort room in the  area and it is free of use where you can changed up your clothes. After that, we then head to the jump off point and started our trek. We started at around 4:30pm and expected to reach the campsite no over 8:30pm. 4 hours is the average time to hike this mountain. And Oh, there is another registration area on the Camp 1. Fee is 20 pesos and I don't know why there are two registration area with fee in this mountain.

2nd Registration area in Mt Pico de Loro
What I like about Mt Pico de Loro is its lush green surroundings. Its trails are fenced with tall trees which make shades for trekkers. Less rays coming from the sun during hike means more energy for trekkers. There are also some parts of the trail wherein fresh air breezes on you which is very refreshing for someone like me who lives in the city. Mt. Pico de Loro is a known hiking destination in Luzon and I would like to commend DENR because what you have implemented to protect this mountain is really working and efficient. Yes, this mountain is protected by the DENR.

Trail of Mt. Pico de Loro is a combination of easy trekking to average. The first part is quite easy as it will only requires you to walk into a slightly slanted trail going up. But as you reach the middle 'till up to the summit, trails are getting steeper. I also noticed that we are not constantly going up. There are parts wherein after we trekked up, the trail will lead into a down trail then up again which is very exhausting and draining. Good thing we started our trek late in the afternoon to almost dark. Mr. Sun almost settling down and the environment is getting humid.

Sir Jay, Sir Orlan and Ewin
After almost forever of trekking, walking in the dark... finally, we heard voices. It only means that we're near the campsite. So our spirits were lifted high and rushed hastily to the top. Approximately 3 hours, we were able to reach Mt. Pico de Loro's campsite. The scene at the campsite were like night market of the metro. Haha. There were lots of mountaineers that night. I've never seen a campsite wherein tents were pitch side by side. Take note, campsite of Mt Pico de Loro is quite big yet mountaineers able to fill that land area. Amazing! Luckily we're able to find a spot where we can pitch our tents. After that, we prepared our dinner, eat and had some socials. Then we decided to sleep as we will head to the summit the next morning.

Great morning!
Moment...
This has been my home for 1 night :)
[I guess] They woke up the next morning at 5am (me at around 6am). Lols. We had our packed hamburgers from Jolibee as breakfast then prepped up to descend at the summit of Mt. Pico de Loro. From the campsite, it took us 20 mins to reach the summit. I suggest extra caution should be taken when going to the summit as the wind blows hard on this part of the mountain. We can't barely stand straight due to the wind. I felt like it will blow my small body into the mid-air. That's how strong it was.

The summit
Jing and Julius
Sir Jay in his signature pose
We're up for this challenge!
Hold tight repa!
Upon reaching the summit is a 360-degree scenic view. Some place I had identified during my stay on top were the Manila Bay, Mt. Marami of Maragondon Cavite, Mt Talamitam and Mt. Batulao of Batangas and the Corregidor.

Awkward selfie pose hahahaha
We cant see straight... and stand straight hahaha
Congrats ladies! You've made it to the summit!
The campsite from the summit...
Aside from the view, you'll also see the pride of Mt. Pico de Loro on its other side - the monolith (also known as Parrot's Beak). Parrot's Beak of Mt. Pico de Loro is a vertical stone structure which stands at around 60 meters. Being able to reach its base is considered to be the most challenging part of this mountain. I attest to that. The trail going on top of it was (a bit) terrifying. I couldn't remember how many times I cursed and said bad words upon my climb up to the monolith. There are part of the trail that you'll be crossing an inclined stone. Some trails were even like my both feet is just right to the trail and a few more inch/step is already a ravine. Apart from having shoes/sandals with good grip, upper body strength is also required as there is a rope installed where you need to hang-on in order to continue the climb. Julius and I were both hesitant to rely all our weight on that rope because it doesn't seemed that strong. Hahaha. So again, be very careful. Accident to this point is really imminent so climbers should take another extra caution when conquering the monolith. After all those things we've been through, a feeling of accomplishment has been a great reward as we reach the base of Parrot's Beak. It is really recommendable to people who loves adventures and to those who are thrill seekers.

Time to descend! 
Terrifying part going to the base of the monolith
(right photo) zoom in mode
My 2nd visit to Mt. Pico de Loro has been a different experience. Plus I have accomplished what I promised to myself back in 2011 - to climb and reach the base of Parrot's Beak. We're blessed that day because the weather favored with us. It was such an amazing trek!

Side story: We climb Pico de Loro at night and we didn't got lost... however, when we descend back to the jump off the next day, and at daytime, we got lost. Hahaha. We didn't know why or how. But just remember that when you see a big trunk and a DENR sign on the trail, take the way up and not the straight way. Lols!

Breakdown of Expenses:
Bus (Coastal Terminal - Ternate Terminal) - 84 Pesos
Tricycle (Ternate Terminal - Jump-off point) - 75 Pesos/pax
Registration Area 1 - 25 Pesos
Registration Area 2 - 20 Pesos
Food - **.**

Thứ Tư, 1 tháng 1, 2014

Mt Manabu of Sto Tomas, Batangas


I started the year 2013 by conquering Mt Timbak and almost reaching the peak of Mt Tabayoc, so I guess the best way to end my 2013 is also by exploring another mountain. I was blessed because I have been invited by my girlfriend's colleagues as they planned to conquer Mt Manabu.

Mt Manabu is located in the town of Batangas. It stands at 720 MASL and considered to be a good climb for newbies (in hiking) because of its relatively light trail. Mt Manabu derived its name from MAtaas NA BUndok which means "alp" or "high mountain". There are 8 stations in order to land on top of Mt Manabu and trekkers have 2 options to reach its peak. One of which is the normal trail wherein you'll be following the stations numerically. While the other one is you'll be taking stations 1 to 4 then take the trail straight to the grotto which is in Station 8. Please see the map below:

Mt Manabu is located at Brgy. Sta Cruz, Sto Tomas, Batangas
How to get there?
Take a Lipa or Lucena bound bus at LRT Buendia then inform the bus conductor to drop you off at Brgy. San Pedro, Sto Tomas. From Sto Tomas, ride a trike to "Sulok". Make sure to visit the Barangay Hall for registration before starting your trek. Registration fee is 20 pesos per pax. You can also ask for a guide here. Guide is around 300-500 pesos (depends on how good you are on bartering).

We reached the jump off point of Mt Manabu around 9PM. Yup, night trek is possible on Mt Manabu. Right after we registered at the barangay, we waste no time and started to trek. The first 4 stations were easy and light. However, the climb becomes more complex from Station 5 and up to the peak due to continuity of upward hike. The trail becomes steeper and challenging. Plus, the trail was muddy during our visit which we didn't expect because it was sunny that whole week. Some part of the trail have "lubid" installed. These ropes are located on sharp angled and steep trails. Trekkers swing to these ropes in order to help them continue on trekking. It was also fun because it added flavor or twist to Mt Manabu.

Shot as we descend at Mt Manabu
After almost 2 1/2 hours, we finally reached the campsite. Located between Station 5 and 6, Mt Manabu's campsite is quite big. It can accommodate large numbers of campers and the signal is pretty strong. We were 14 people in the group and we were able to pitch 7 tents along with other campers and still it is spacious.

Right after we pitched our tents, we started to prepare our late dinner. It was really cold up there so I recommend to pack up jackets and other thick clothes when planning to stay overnight at Mt Manabu. After some chit chat and socials we then took a rest.

Getting ready to descend
After packing our things, its time for some photo op
Konting pakilig lang... =]
The next day, we woke up early and took a light breakfast. Then we packed up our things as we will continue to explore Mt Manabu (particularly Station 7 & 8). In between station 6 & 7 lies a cross and marks that you already reached the peak of Mt Manabu. On the other hand, Station 8 hold a grotto. And because of these landmarks, Mt Manabu becomes a popular destination for Visita Iglesia.

Big cross found in between Station 6 and 7
Grotto at Station 8
Since we descend Mt Manabu on the morning, I appreciate the environment even more. The shades of the trail are very evident. Shades that come from its rich forest. The trail is surrounded by trees and plants. Nature is really being take care off at Mt Manabu. Kudos!

And because of those shades, it lessens the tiredness and perspiration we experienced on exploring this mountain. We were able to reach the jump off point again in 2 hours or less.

Shades. One of a few reason why I love Mt Manabu
Rich nature. Happy people.
Passing through Station 4
It was nice meeting new people. My experience with Mt Manabu was definitely a fun climb. I just hope fellow trekkers and people around the area maintain the cleanliness of this mountain for future generations.

Additional information: Comfort rooms are available in the jump off point. You may directly go here after your hike for a quick bath or to wash your shoes. You may also display there your wrecked shoes just in case you experience one during your climb. Lols.

We survived Mt Manabu! Wew!